Beadwork, Polyhedra

Augmented Dodecahedron

Making polyhedra using round beads and polyhedral angle weave is my current favourite bead technique! Here’s an augmented dodecahedron made using 4mm beads:

BeadMechanics_Dodecahedron1

This is a dodecahedron with extra dodecahedra added to each face (augmentation). In theory there should be a slight gap between each neighbouring dodecahedron, but with the beadwork you can merge them together to end up with this shape.

It did require quite a lot of concentration to weave but it was still an enjoyable experiment. I’m definitely going to be trying more shapes like this!

BeadMechanics_Dodecahedron2


Beadwork, Polyhedra

Near-Miss Johnson Solids

The Johnson solids are strictly convex polyhedra with regular polyhedra as faces – that is polygons with sides and angles that are all the same. Near-miss Johnson solids however are strictly convex polyhedra that almost have regular polyhedra as faces, but not quite. There are actually a lot of interesting polyhedra that meet this definition. And since they are almost regular you can try making them using same sized beads and let the beadwork distort slightly to make up for the slight differences needed.

Here are a few of them made with illusion cord and 4 mm beads using “polyhedral angle weave” (which is just regular angle weave used to make the various polygons that make up a polyhedron).

BeadMechanics_JSNearMiss11

The first one is a truncated triakis tetrahedron, which has 12 pentagon and 4 hexagon faces:

BeadMechanics_JSNearMiss2

This was easy to make and only needs 42 beads. It’s fairly small and makes a nice little beaded bead!

The next is a chamfered dodecahedron. This is similar to a truncated icosahedron but with ten more hexagons:

BeadMechanics_JSNearMiss4

This one has 120 beads and works really well. It’s a bit bigger than a truncated icosahedron and looks very round, definitely one of my favourites!

The third is a rectified truncated icosahedron. This is basically a truncated icosahedron with triangles added between all the faces:

BeadMechanics_JSNearMiss6

This one has 180 beads and is less round but is still an interesting shape!

The next is an expanded truncated icosahedron, which is sort of like a truncated icosahedron version of a rhombicosidodecahedron. It has triangle, square, pentagon and hexagon faces:

BeadMechanics_JSNearMiss7

This has a lot more beads – 360 in total – and is much bigger than the others. It was a struggle to keep it looking reasonably symmetric, but the patterns made up by the combination of pentagons or hexagons surrounded by triangles and squares are really quite pretty.

The last one is a snub rectified truncated icosahedron and is like a truncated icosahedron version of a snub dodecahedron. It’s made up from triangles, pentagons and hexagons:

BeadMechanics_JSNearMiss10

This is larger still at 450 beads and does not work well at all! The faces are just too far away from regular to work with identical beads and it just wasn’t possible to get it to be symmetric. Well, not all experiments work! I’ll definitely be making some of the smaller ones again though!


Beaded machines, Beadwork, Tutorials

Oval Kaleidocycle Tutorial

This video of a kaleidocycle made from peyote ovals was the first post on my blog almost four years ago.

The tape on my hands in the video is to cover up scrapes from rowing, not beading the kaleidocycle – and since I can’t go out to row at the moment I took the opportunity instead to finish the tutorial for it that I drafted several years ago to share with you all!

Tutorial

This tutorial is also available as a pdf!

This kaleidocycle is made from six tetrahedrons. Each tetrahedron is made from six peyote ovals. The ovals are all identical apart from the two accent colours used in the pattern. There are then two different combinations of the ovals to form the tetrahedra – pattern 1 and pattern 2, which is a mirror image of pattern 1.

Continue reading

Beadwork, Tutorials

PDF Tutorials

I’ve now finished creating pdf versions of all the tutorials here on the blog – added to the two from last week are the Folding Cube and the gyroelongated square bipyramid kaleidocycle, which I’ve renamed Solar Cycle since it’s easier to say and the shape makes me think of a simple drawing of the sun!

Here are all four tutorials – click on the name to download the pdf!

Folding Cube

BeadMechanics_FoldingCubePDF

Solar Cycle

BeadMechanics_SolarCycle

Spherical Harmonics

BeadMechanics_SphericalHarmonics

Trefoil Knot Kaleidocycle

BeadMechanics_TrefoilKnot

Happy Beading!

Beadwork, International Beading Week

International Beading Week

I’m really pleased to say that I’m going to be an Ambassador for this year’s International Beading Week! I’m already planning beading activities and putting together some patterns and tutorials to share with everyone to celebrate the week!

IBW Logo

This year International Beading Week (IBW) takes place from the 25th July to 2nd August. The aim is to bring beaders together and inspire people to take up the craft! More details of everything that will be happening can be found on the IBW website.

As a start I’ve been doing a bit of work creating pdf versions of the free tutorials here on my website! Hopefully this will make them easier to save and print. Here are the first two!

Spherical Harmonics

Spherical Harmonics is the Rick Rack Dodecahedron – which finally has a name! Spherical harmonics are a type of function defined on the surface of a sphere which have many uses in maths and physics. The visualisations of these functions remind me of the shape of the rick rack dodecahedron.

BeadMechanics_SphericalHarmonics

Trefoil Knot Kaleidocycle

Did you know that the trefoil knot kaleidocycle is also a Möbius kaleidocycle? If you use a different colour for one edge of the band of tetrahedra you’ll see that it has a twist when you join the ends together to make the trefoil knot!

BeadMechanics_TrefoilKnot

The pdf versions of the folding cube and gyroelongated square bipyramid kaleidocycle tutorials will also be available soon!

People Chain x 12

Beadwork, Polyhedra

Rhombic Dodecahedron

Here’s a fun shape – a rhombic dodecahedron made from warped hexagons and octagons. I wasn’t sure how well this was going to work, but I really like the way each face looks like a slightly folded square. A rhombic dodecahedron has twelve diamond-shaped faces, so I knew it wouldn’t look completely symmetric and it’s interesting to see how it’s turned out!

Rhombic_Dodecahedron_Vertex_Hyparhedron_Verrier_BeadMechanics

I also really like the colour of these green delicas – I don’t use green very often but glad I did this time! I was also very relieved that inclusion of a few matte delicas (the row of brown beads) did not result in disaster! I’m always a bit wary of matte beads since they seem to break very easily, but treated with a lot of care they worked out well.

I started this about 2 years ago just before a move but it got left forgotten afterwards for most of that time. Decided it was about time to finish it last summer! It’s quite similar to the Hypernova dodecahedron in some ways – both are what I’m going to call vertex-hyparhedra, because they are based on the idea of placing higher-order hypars over the vertices of a polyhedron. I think I’m going to start calling the other beadwork hyparhedra edge-hyparhedra (as they involves putting hypars over the edges), and Erik Demain’s original method face-hyparhedra (as it involves putting hypars over the faces of polyhedra).

Rhombic_Dodecahedron_Vertex_Hyparhedron2_Verrier_BeadMechanics

Whatever it’s called it’s definitely an odd little shape, but I like it!

Beadwork, Polyhedra

The Beaded Johnson Solids Project

The peyote octagon and decagon make it possible to bead a lot of polyhedra. For example here’s a truncated cube – one of the Archimedean solids – made using triangles and octagons:

TruncatedCube_BeadMechanics

It’s a fun shape – I think it looks like it’s made of flowers!

As well as the Archimedean solids it’s also now possible to make all the Johnson solids, and Diane Fitzgerald has set up a project to do just that!

The Johnson solids are all the strictly convex, regular polyhedra that aren’t uniform. A convex polyhedron is one that has no “valleys” on it’s surface, like the truncated cube above. Strictly convex means that flat surfaces formed by polyhedrons don’t count as convex either – so a polyhedron that is essentially a cube with each square face split up into four smaller squares would not be strictly convex, since the larger square made from the four smaller ones would be flat. Regular just means that the polyhedra are made from regular polygons, which have equal angles and sides. A uniform polyhedron is a regular polyhedron that has identical vertices – that is, each vertex is made of the same combination of faces meeting in the same order and at the same angles. The Platonic solids, Archimedean solids, prisms and antiprisms are all uniform convex polyhedra. All the other non-uniform regular convex polyhedra make up the Johnson solids.

There are exactly 92 of these shapes, and they were first listed by Norman Johnson in 1966 in the paper Convex polyhedra with regular faces (Canadian Journal of Mathematics, 18, 169). This list was then proved to be complete shortly afterwards by Vicktor Zalgaller (Convex polyhedra with regular faces, Seminars in Mathematics Volumne 2, V. A. Steklov Mathematical Institute 1966, English translation: Consultants Bureau, 1969). They’re numbered as J1 through to J92, and each has it’s own (often very long!) name. Although there are 92 different shapes they’re all combinations of just triangles, squares, pentagons, hexagons, octagons or decagons!

Diane’s project is a call to beaders internationally to join in making the 92 Johnson solids out of flat peyote shapes, just for the fun of it! Once complete they will be strung in order and be available for display.

If you volunteer for the project you get to pick the shape you want to make (and then give a beadwork name to!) and you’ll get a (free!) copy of the instructions for the basic shapes and a guide on how to make the Johnson solids. It’s a great opportunity to learn some new beading skills! There’s a facebook group for the project here, or you can contact Diane directly for more information.

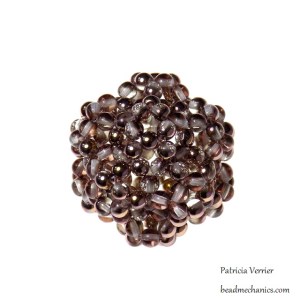
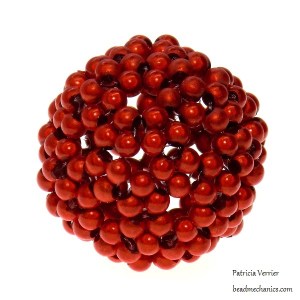
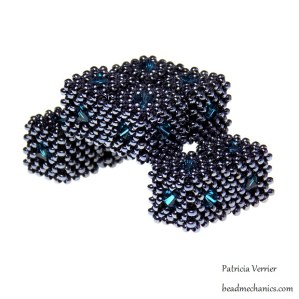
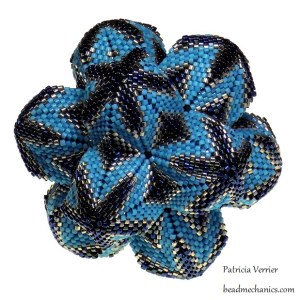
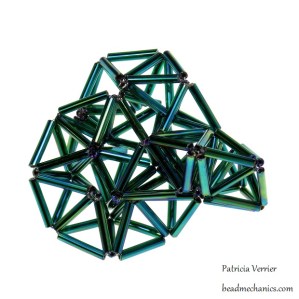
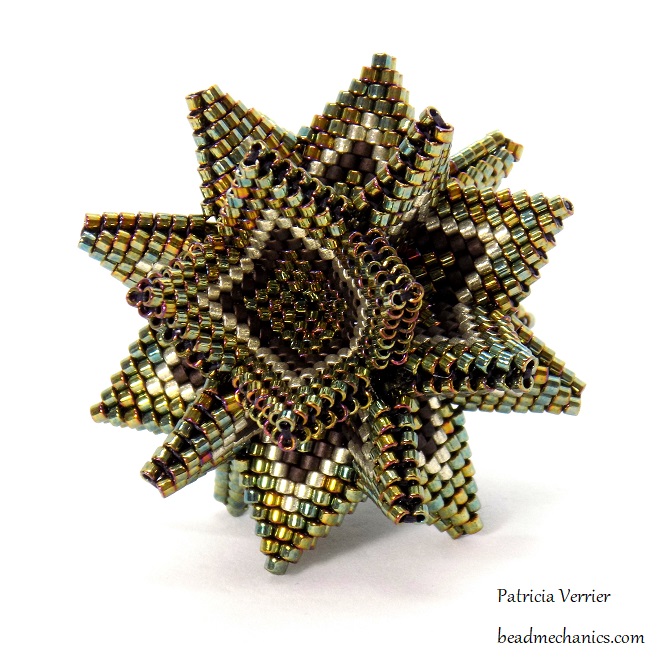
At the moment more than half the shapes are in progress or complete. Here are some photos of a few of the finished polyhedra!


InaHascher_J5_J16

J5 and J16 by Ina Hascher


VeePretorius_J13_J59

J13 and J59 by Vee Pretorius


MariaCristinaGrifone_J46

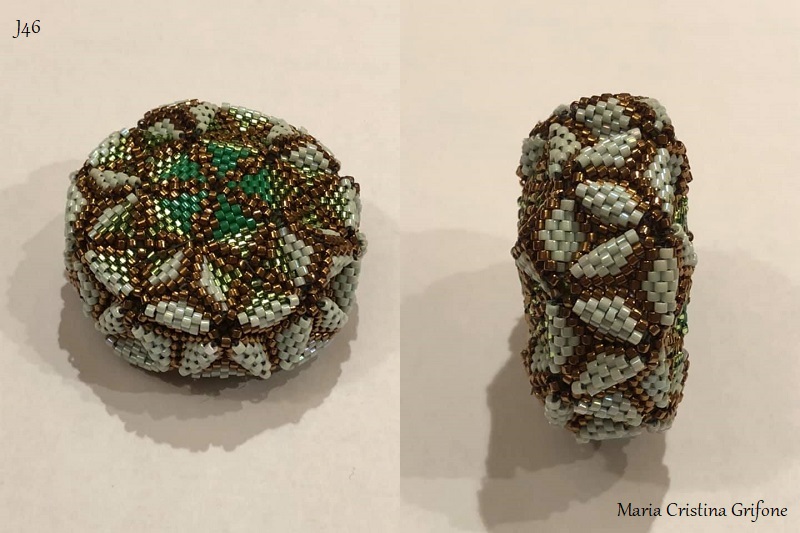
J46 by Maria Cristina Grifone


DianeFitzgerald_J57

J57 by Diane Fitzgerald


NancyJenner_J58

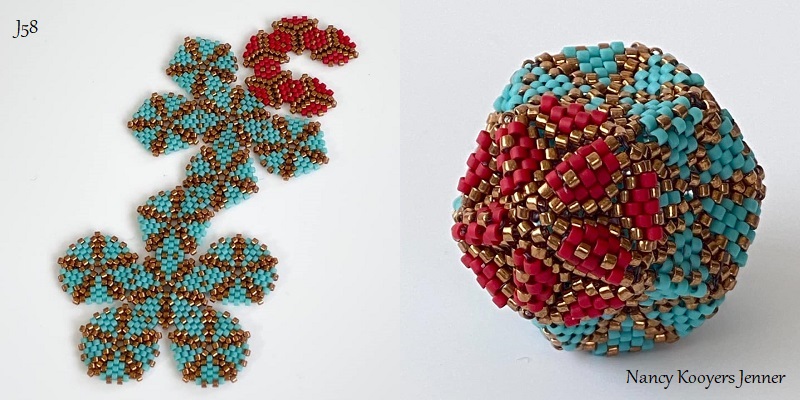
J58 by Nancy Kooyers Jenner


CarolRomanoGeraghty_J63

J63 by Carol Romano Geraghty


SylviaLamborg_J91

J91 by Sylvia Lambourg


GerlindeLenz_J92

J92 by Gerlinde Lenz

They’re all fascinating and beautiful! Here’s the complete set of Johnson Solids, J1 through to J92 in order left to right, then top to bottom. Please join in and bead one!

JohnsonSolids2


Beadwork

Flat Peyote Decagon

Following on from the peyote octagon, here’s a flat peyote decagon!

Decagon_BeadMechanics

A decagon is a 10-sided polygon. The formula derived to calculate the increases for an octagon can also be applied to a decagon by setting n = 10, and it says 0.4 extra beads are needed per row. That’s 2 beads every 5 rows, which is actually easy to do in peyote with the increase pattern 2-1-0-1-0.

However, I decided to stagger this pattern slightly in order to make the increase in row length a bit more gradual, which also allowed me to start with a ring of 5 beads instead of 10. I slightly changed the pattern in the last two rows to be 2-1 all around (rather than alternating different increases) so that the last row is the same on all edges, which makes it easier to join to other shapes.

The result is as you see above – a flat peyote decagon! I’m very pleased with how it turned out – and that the formula worked for this shape as well!

Diane Fitzgerald has written some great detailed instructions for all the flat peyote polygons – including the octagon and this decagon! They’re available here in her Etsy shop DianeFitzgeraldBeads.

Happy beading!

Beadwork

Flat Peyote Octagon

Earlier this year I was challenged to make a flat peyote octagon. Most beaders are probably familiar with peyote triangles, which use the increase pattern 2-2-2, and  hexagons, which uses the increase pattern 2-1-0:

BeadMechanics_PeyoteHexagon

Diane Fitzgerald shows how to make all the flat polygons up to a hexagon in her book Shaped Beadwork. But what is the increase pattern for an octagon?

octagon

To answer the question I decided to make a mathematical model of the beadwork! (It’s actually just some simple geometry – so please don’t run away at this point – there is beadwork here too!)

Lets start by thinking about what a peyote polygon looks like. The easiest one to think of is a triangle:

BeadMechanics_PeyoteTriangle2

We can split the triangle up into 3 segments or “cells” – the parts in-between the three herringbone (or 2-2-2) increases. These are themselves isosceles triangles:

  BeadMechanics_PeyoteTriangle      triangle

You can see that each of the “cells” grows by 2 beads width each row – counting the total width of the row, rather than just the number of beads you would use to actually bead the row.

If you think about any regular polygon, you can see that it can be split up into these triangular “cells” too:

polygons

The angle at the corner of each of the triangular cells (the one at the centre of each polygon) will be equal to 360 degrees divided by the number of sides – this will be useful later on!

Since any polygon can be built out of these cells this is a good point to start with the mathematical model. Here is a diagram of a cell – to make the drawing easier I’ve used the increase pattern for a triangle, but I’ll extend it to other shapes in a minute:

BeadMechanics_Triangle0

The width (= length) and height (= diameter) of the beads will be important. I am going to call them w and h. For delicas we can look them up on Miyuki’s website, which states that the width of size 11 delicas is 1.3 mm and the height is 1.6 mm.

BeadMechanics_Triangle1

I want to know how many extra beads are needed each row to make the cell the right shape to make an octagon. Lets start in an ideal world where we can add the exact same number of beads every row, even if it’s a fraction of a bead (in reality to actually bead the shape you’d add beads one row then none the next to end up at the same number on average rather than per row). I’m going to call the extra number of beads needed “x“.

We know the width w of the beads, so if any given row is width R then the row above it will be width R plus the number of extra beads x times w:

BeadMechanics_Triangle2

As this is peyote the height difference between these two rows will be half the height of the beads, h/2:

BeadMechanics_Triangle3

What we want to know is what is x to keep the cell the right shape. To answer this we just need some trigonometry (see it is useful!). The row height and width differences worked out above are the height and width of the two orange triangles shown in the diagram below:

BeadMechanics_Triangle4

Since the cell is symmetric these two triangles are identical: both are height h/2 and together they must be width xw, so each one is half that, or xw/2. We also know that the angle at the inner point of the triangle will be 360 degrees divided by the number of sides of the polygon. For now lets say that there are n sides (for the octagon n will be 8). This gives us the angle at the bottom of the cell, which can be used to work out the angle of the orange triangle too (using symmetry and similar triangles – something else you probably thought would never be useful!):

BeadMechanics_Triangle5

That gives a right-angle triangle with an angle and two sides, and all that’s needed is some trigonometry to determine that the number of extra beads needed per row for a polygon with n sides is:

x = (h/w) tan(180°/n)

Simple (honest!) – but does this simple calculation actually work in practice?

If we use the width and height of size 11 delicas then for a triangle (n = 3) the formula above says that you need 2.1 extra beads per row – almost spot on for the triangle increase of 2 beads per row! And for a hexagon (n = 6) it says you need 0.7 beads extra per row. If you look at a hexagon you can see that overall the 2-1-0 increase adds 2 beads width every three rows – so on average the increases is 2/3 = 0.67 beads per row – which is again almost identical to the formula. So it seems to work!

Now the interesting part: what is the number of beads needed for an octagon with n = 8? If you put the numbers in to the formula it gives about 0.5 beads extra needed per row… which unfortunately is going to be a bit difficult.

It’s only really possible to increase at in increments of 2 (or more) beads per row, as 1 or 0 is just a normal peyote stitch (or possibly a decrease). So to get on average 0.5 beads per row you’d need to increase 2 beads every 4 rows, which wouldn’t really work – not only would it be a bit to far between increases to approximate the gradual increase, but if you add 2 in a row, then you must add 1 the next, then 0, then 1, which leaves you trying to do an increase on top of a bead not a space, which isn’t going to work well. So, instead of sitting around waiting for the invention of half-delicas I decided to try a different approach: an asymmetric alternating increase pattern:

  • Start with 4 beads in the first row.
  • Then alternate 2-1-0 and 0-2-1 increases around each side – so the eight 2 increases aren’t all in the same row.
  • This gives slightly too many beads per row so to keep the piece flat one set of increases needs to be skipped at about row 10.

Here’s a photo of my first attempt at a flat octagon using this method:

BeadMechanics_Octagon1

I used blue and red for the alternating increases and green for the normal peyote stitches in-between. I started with 4 beads, then added another 4 total in next round (all in red), then increased by 2 in each space in the third round (this is where the first blue beads appear). The next round the blue “increases” are just 1 bead, and in-between them the red increases are 2 beads. After that I continue on alternating the 2-1-0 increase pattern until row 10, where I skip a 2 increase in the red beads, and just use 1 bead instead (you can see where there are two single red beads stacked on top of each other. Then I continued on with in-step 2-1-0 increases for a few rows until I ran out of thread.

The centre has gone a bit wonky – mostly this was a result of poor tension as for some reason I could only find size 00 thread, which was just too thin to maintain the tension in the centre! It’s fairly symmetrical though, despite the alternating increases, and also – more importantly – flat!

Having located a more appropriate thickness of thread I made a second attempt with a few more rows:

BeadMechanics_Octagon2

This uses the same increase pattern, but now the increases are all in silver and the normal peyote between them in alternating blue and green until row 10, which is in orange (and is where one set of 2 increases is skipped). All the rows beyond this (where the increases are in-step) are in red. The benefit of the skipped increase at row 10 (apart from keeping the shape flat!) is that you end up with identical edges, which is helpful both for the overall symmetry of the shape and if the octagon is going to be stitched to other shapes.

I’m much happier with the second attempt – it’s more symmetrical and also still flat, so all-in-all a successful experiment applying mathematical modelling to beadwork!


Beadwork, Polyhedra, Tutorials

Rhombicosidodecahedron Hyparhedron Variation

Here’s an interesting variation on a hyparhedra – a rhombicosidodecahedron which uses both warped squares and hexagons.

rhombicosdodec_hypar_var_verrier2

A rhombicosidodecahedron is an expanded dodecahedron with rings of squares and triangles surrounding the pentagon faces. This means that this beaded version can be thought of as an expanded version of Hypernova! Here they are side-by-side:

rhombicosdodec_hypar_var_verrier3.JPG

As you can see it’s pretty big! It took a lot longer to bead than I thought it would, but I’m very happy with how it turned out.

The idea for this started with a geomag 1.5 scale rhombic hexacontahedron by Rafael Millán, which I came across earlier this year. At about the same time I was working on warped square hyparhedra, and I realised that this polyhedron would be possible as a hyparhedron using a combination of both warped squares and warped hexagons. Essentially it’s a variation on the warped square rhombicosidodecahedron hyparhedron where the three warped squares making up the triangular faces are replaced by a single warped hexagon.

I’ve wandered into this idea before with the truncated tetrahedron hyparhedron – on the left in the photo below is the warped square hyparhedron version and on the right is the variation with the triangular faces replaced with warped hexagons:

truncated_tetra_hypar_verrier

It’s interesting to see that it also works with a larger shape. I’m still working on the plain hyparhedra version of the rhombicosidodecahedron, but it will be great to see them side-by-side when finished too!

This one took too long to create a tutorial, but here’s a layout diagram if you want to attempt it! In total it needs 20 warped hexagons and 60 warped squares. The warped squares sit over the edges of the pentagons, with the peaks and the corners and the valleys meeting at the centre. The diagrams below show the top half of the rhombicosidodecahedron. On the left is the position of one warped square outlined in red – the increases are shown as dashed lines and the peaks marked with circles. On the right a whole set of warped squares is shown around the top of the shape.

The warped hexagons join it all together. They sit at the centres of the triangular faces and are “zipped” to the warped squares. The diagram on the left shows how one warped hexagon joins to one warped square. The diagram on the right shows a set of warped hexagons around the top of the shape.

I made the warped hexagons completely, and then joined the warped sqaures to them. The angles in the square faces are quite tight, so I tried to always start the join towards them and end it at the pentagon side, so there was more space to work. As ever with these shapes, a curved beading needle is essential!

It took me a while to get my head around the shape, but it eventually clicked! Just ask if you have any questions about it!

rhombicosdodec_hypar_var_verrier1