This video of a kaleidocycle made from peyote ovals was the first post on my blog almost four years ago.
The tape on my hands in the video is to cover up scrapes from rowing, not beading the kaleidocycle – and since I can’t go out to row at the moment I took the opportunity instead to finish the tutorial for it that I drafted several years ago to share with you all!
Tutorial
This tutorial is also available as a pdf!
This kaleidocycle is made from six tetrahedrons. Each tetrahedron is made from six peyote ovals. The ovals are all identical apart from the two accent colours used in the pattern. There are then two different combinations of the ovals to form the tetrahedra – pattern 1 and pattern 2, which is a mirror image of pattern 1.
The peyote ovals have a size 8 seed bead as the point beads in the last round. These are then used to join the ovals together to form the tetrahedra. The tetrahedra are then connected to each other with jump rings through the point beads to make hinges and form the kaleidocycle.
The pointed peyote oval shape is originally by Diane Fitzgerald, and is one of the many peyote shapes described in her wonderful book Diane Fitzgerald’s Shaped Beadwork: Dimensional Jewelry with Peyote Stitch (Lark Jewelry Books, 2009).

Materials list
- Size 11 Delica beads:
- DB 1793 – White-lined grey AB (A), 10g
- DB 1852 – Duracoat galvanised pewter (B), 5 g
- DB 610 – Dyed silver-lined dark violet (C), 2 g
- DB 1342 – Dyed silver-lined dark rose (D), 2 g
- DB 604 – Dyed silver-lined golden olive (E), 2 g
- DB 2169 – Duracoat silver-lined dyed lilac (F), 2 g
- Size 8 Miyuki seed beads:
- 451 – Gunmetal (G), 2 g
- 12 x 6mm silver-coloured jump rings (must be able to fit through the size 8 beads)
- Size D Nymo, grey
- Size 12 beading needle
- Pliers
Making the Ovals
There are 6 different oval patterns, different only in the accent colours. You will need to make 6 of each one, so you have a total of 36. The patterns for each oval are shown in the following sections.
Use a fairly firm tension, so that the oval will maintain it shape when part of the kaleidocycle – make sure you hold the tail thread as you work to keep the tension constant. As you add rows 4 and 5 the oval should stop being flat and pull into a convex shape.
Before you add the size 8 point beads make sure that a jump ring can fit through them.
Stitch all the tail threads in. For some of the ovals you will need to leave the working thread exiting from one of the point beads, as directed in each pattern. This is then used to join the ovals together to make a tetrahedron.
Violet-Lilac Oval
On 100 cm (40 inches) of thread string the first two rows of the pattern starting from the middle of one of the increases (C, {B, A} 7 times, B, 2F, {B, A} 7 times, B, C). Leave a 15 cm (6 inch tail) and pass through the first 17 beads again to form a ring and exit from the first of the F strung, ready to stitch the first increase of round 3 of the pattern.
Stitch the next 3 rows of peyote following the diagram below. In the last round the two increases are replaced by a size 8 point bead (G). Before adding these beads make sure that a jump ring can fit through them.
Stitch in the tail thread. Leave the working thread exiting from the point bead on the lilac (F) side – the right-hand side in the diagram below.
Make 6.

Violet-Rose Oval
Follow the same steps as for the violet-lilac oval, but use D in place of the F accent colour.
Stitch in the tail thread. Leave the working thread exiting from the point bead on the violet (C) side – the left-hand side in the diagram below.
Make 6.

Violet-Olive Oval
Follow the same steps as for the violet-lilac oval, but use E in place of the F accent colour.
Stitch in both the tail and working thread for this oval.
Make 6.

Lilac-Rose Oval
Follow the same steps as for the violet-lilac oval, but use F in place of the C accent colour and D in place of the F accent colour.
Stitch in the tail thread. Leave the working thread exiting from the point bead on the rose (D) side – the right-hand side in the diagram below.
Make 6.

Lilac-Olive Oval
Follow the same steps as for the violet-lilac oval, but use F in place of the C accent colour and E in place of the F accent colour.
Stitch in both the tail and working thread for this oval.
Make 6.

Rose-Olive Oval
Follow the same steps as for the violet-lilac oval, but use D in place of the C accent colour and E in place of the F accent colour.
Stitch in the tail thread. Leave the working thread exiting from the point bead on the olive (E) side – the right-hand side in the diagram below.
Make 6.

Joining the ovals together
Six ovals are joined together to make a tetrahedron. The ovals sit over the edges of the tetrahedron, and three meet and are joined together at the vertices. They are arranged so the accent colours match where they meet at the vertices. Instructions for how to make this join are given below, followed by the joining patterns. There are two different joining patterns – pattern 1 and pattern 2 – which are mirror images of each other. You will need to make three of each pattern.
Joining three ovals to make a vertex
Join the point beads from each oval in a loop, as shown in the diagram below. The ovals should be aligned so they are all have the concave side facing upwards towards the outside of the tetrahedron.


I used about 5 to 7 repeats of this thread path through the size 8 beads to make sure the hinges were not too loose, but this will depend on the beads, the jump rings and the thread. Check that a jump ring is able to slide through the bead (in the direction shown in the left-hand photo below), but not rotate too much in the other direction (as shown in the right-hand photo below). Once you are happy with the join, fasten off the thread securely by weaving it back into the oval.


Tetrahedron Pattern 1
Make 3.
Lay six ovals out in the following pattern with the concave sides facing upwards:

The center of the diagram (violet, accent colour C) will be the top of the tetrahedron.
The positions of the remaining working threads are shown in green in the diagram (assuming the ovals were stitched in an anticlockwise direction, if not then the thread will exit the opposite side of the point beads).
First start by joining the central three pieces together using the point beads on the violet (C) end of the ovals:

Next join the two other rose (D) ovals to the central three as shown:

Now bring the rose-olive (D and E) oval across so it can be joined to the other olive (E) oval from the central group and the one remaining unjoined oval, as shown below:

The diagram shows the beadwork flattened but the join is as before, and the central join (violet, D) should now be above the other two.
Finally, join the three remaining free ends (lilac, F) as shown below:

Again the joins are as before, and the central join should be above the other three.
You should now have a tetrahedron that looks like this:

Tetrahedron Pattern 2
Make 3.
This tetrahedron is made in the same way as the other, but it is a mirror image so that the olive (E) and rose (D) sides of the ovals are on opposite sides.
The process is exactly the same as before, you just need to start by laying out the six ovals in the pattern shown below:

The finished tetrahedron should look like this:
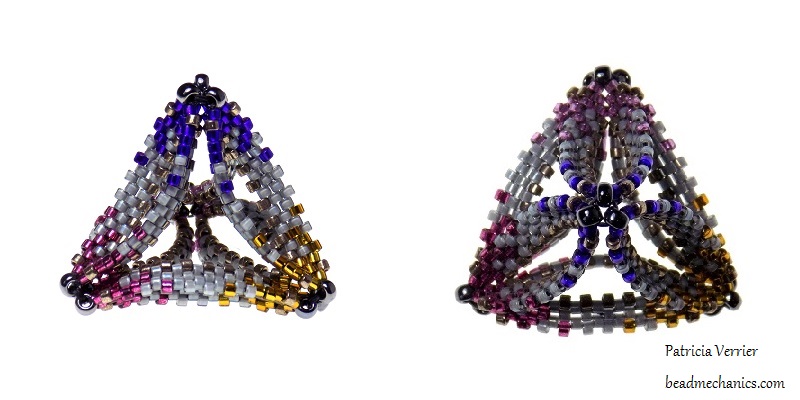
It should be a mirror image of tetrahedron 1:

Joining the tetrahedra together
Lay the tetrahedra out in a ring in the pattern shown below, with the olive (E) vertices pointing upwards and the violet (C) vertices pointing into the centre of the ring.

The tetrahedrons will be joined together in this order with jump rings threaded through pairs of the size 8 beads. The joins will be alternately between pairs of violet-rose (C–D) ovals and between pairs of lilac-olive (F–E) ovals, as shown above.
To join a pair of ovals, thread an open jump ring through the pair of point beads at one end of the ovals and then close it. The joined point beads should look like this:

You then need to add a jump ring at the other end of the pair of ovals in the same way. The finished joins should look like this:


These joins create the hinges of the kaleidocycle. With the tetrahedra laid out as shown in the diagram the violet-rose (C–D) hinges will be horizontal and the lilac-olive (F–E) hinges will be vertical:


Work around the ring joining one tetrahedron to another until you have made all six hinges. The kaleidocycle is then complete!
Happy Beading!

© Copyright 2020 Patricia Verrier. All rights reserved.
These instructions are for personal use only. Please contact me if you require more information.

Thank you again for your wonderful tutorials!!!
Happy and Safe Holidays to you!!!
Suzanne
Sent from my iPhone
>
LikeLiked by 1 person