Here it is – a detailed tutorial for the folding cube!

This is the first tutorial I’ve ever written so hopefully it makes sense! Any questions just ask.
This tutorial is also available as a pdf!
Materials
I used the following beads for the original cube:
- Size 11 seed beads – about 22g – Miyuki, gunmetal, colour 451
- 4mm crystals – 24 – Swarovski bicones, blue zircon
You’ll also need:
- Size B nylon (nymo or s-lon etc.) thread – black
- Size 12 beading needle
- Curved beading needle (size 10, but I think that’s the only size you can get)
Cubic Right Angle Weave (CRAW)
The individual cubes are made using cubic right angle weave (CRAW). I’ve written the tutorial assuming familiarity with this stitch, such as how to go round corners and how to build off existing work. If you’re not familiar with it don’t worry – there are many tutorials online! The pattern shouldn’t be too difficult once you master the basics of the stitch.
Modified Right Angle Weave (MRAW)
The hinges on each cube are done with modified right angle weave (MRAW). If you’ve not come across this stitch before you should check out the instructions on the CGB site. They can be found on page 39 of the freely available ‘Basics’ section of CGB volume 1.
Making a model
I found it very helpful to have a model of an unfolding cube to refer to – it makes it much easier to work out which hinge goes where when you have an example right in front of you!
There are several options for making a model. The first is to find 8 small cubes and join them together (see below for the joining pattern). The second is to print out a paper net and make a complete cube all in one go (although this was not the easiest to do!).
Hinge pattern
I’ve used some 20mm wooden cubes and some stickers and tape to put together a model. (Wooden cubes seem pretty easy to get hold off from craft shops or online – or you could also make individual cubes out of paper.)
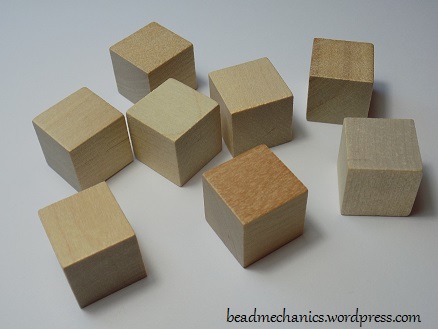
The stickers mark the faces where the crystals are going to go – 3 on each cube. Each cube is identical until the hinges are added – this makes everything much easier! They look like this – 3 adjacent faces have stickers/crystals, and the other 3 are blank:

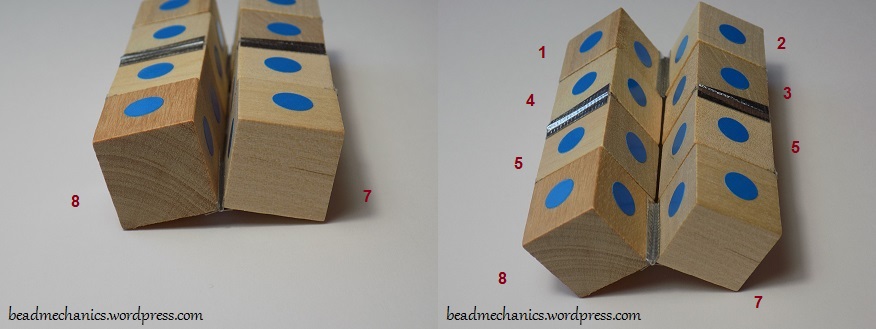
Here’s how the 8 cubes go together. I’m going to number them 1 to 8 to make the later instructions clearer.
First join cubes 1 and 2 by making a single hinge by sticking tape along the edge as shown (I stuck a piece of tape on both sides of the hinge to make it stronger):

Then add cube 3 like this, paying close attention to where the stickers are:

Then add cube 4 on the other side, and fold cubes 3 and 4 in as shown on the right:

Then add cube 5:

And cube 6 (still making sure all the stickers are in the right place – although don’t worry if you make a mistake, you can always peel them off and stick them back on!):

Then add cube 7 like this:

And finally add cube 8 as shown:

There’s one more hinge to go – the one between cube 7 and cube 8, which is along the bottom horizontal edge as shown:
That’s it! You should now have a working model, which folds into two different cubes – one with stickers on all the faces, and one with blank faces:

If you’ve made a model as above and rotated it around a few times you may notice you can unfold it into a rectangle so it looks like the photos above but the hinges are all in the wrong places. Don’t panic! This is because there are two different places in the complete folding-unfolding cycle where the cube flattens out to a rectangle, and they have the individual cubes in a different order. Just continue folding and unfolding and you’ll get back to where you started.
Now you have a model, on to the beadwork!
The pattern
The pattern is split into 2 parts:
- Making the 8 individual CRAW cubes
- Adding the hinges to each cube and joining them together
CRAW cubes
Here are the instructions for making each individual cube. You’ll need to make 8 of these.
The individual cubes are made out of cubic right angle weave (CRAW) units.
Start with a comfortable length of thread and a normal size 12 needle – I use about one and a half armspans length of thread at a time, since CRAW uses up the thread fairly fast. When you need to end a thread, just weave the end into the beadwork following the existing CRAW paths until it’s secure, and cut it off. Join the new thread into the beadwork in a similar way.
I’ve used different coloured beads to the original here to make the photos clearer. The original was made entirely using gunmetal coloured beads throughout.
Step 1
Make a 2 by 2 block of CRAW units, leaving enough of a tail to comfortably stitch back in.
(Right click a photo and select ‘view image’ to see a larger version!)

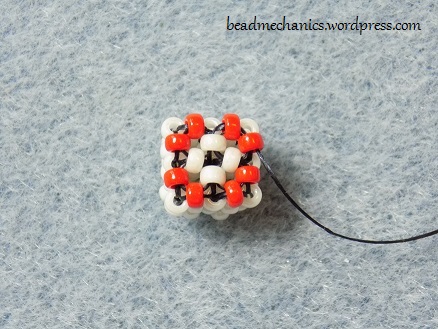
Step 2
Add another 2 by 2 block on top of this to make a cube.
This will be the centre of the completed cube.

This is also a good point to stitch the thread tail in. (It’s also a good idea not to cut it off completely for the time being, just leave it fairly short so it’s out of the way, otherwise you can end up stitching through it and pulling the end back out.)

Step 3
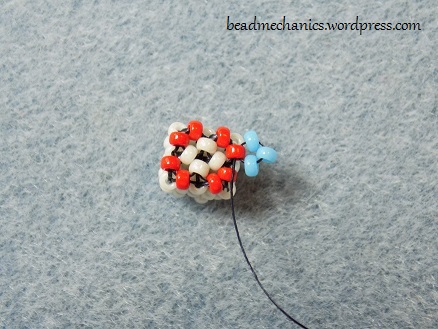
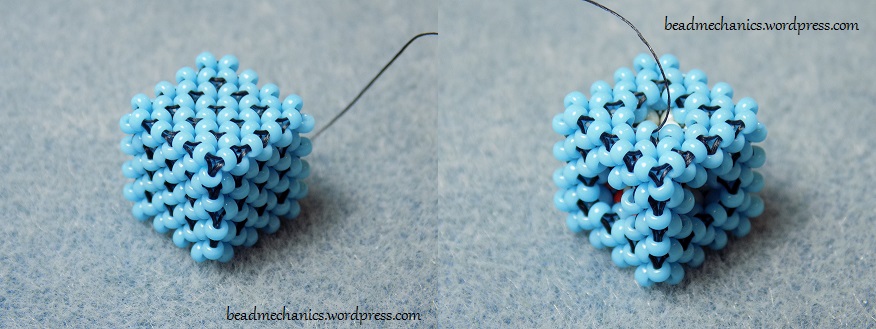
We’re now going to add the first ‘frame’ face – one that will eventually have a crystal in the centre. This is done by adding a frame of CRAW to the top of the 2 by 2 cube, anchoring it to the edge beads of this face.
I’ve made a new cube with different coloured beads to highlight the edges of the top face. Here’s how the first unit is attached:
First, make the bottom of the new CRAW unit as so:
Then add the sides and top to complete the unit:
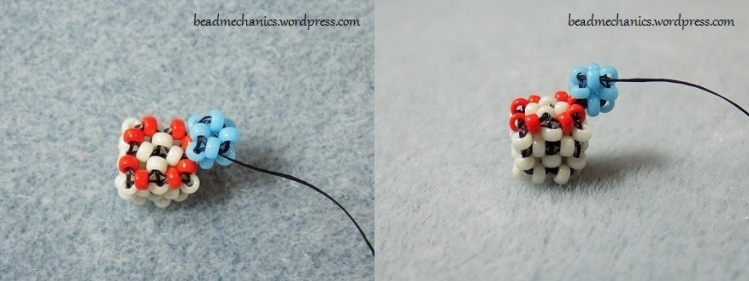
We’re now going to work along the edge by adding a second CRAW unit next to the first in a similar way:

Now we’re at the corner. This corner CRAW unit is different, it has no edge bead to start from so is just joined to the previous (blue) unit on one side and is suspended in mid-air!

The next edge and corner is completed as before – just keep working around the next two sides:
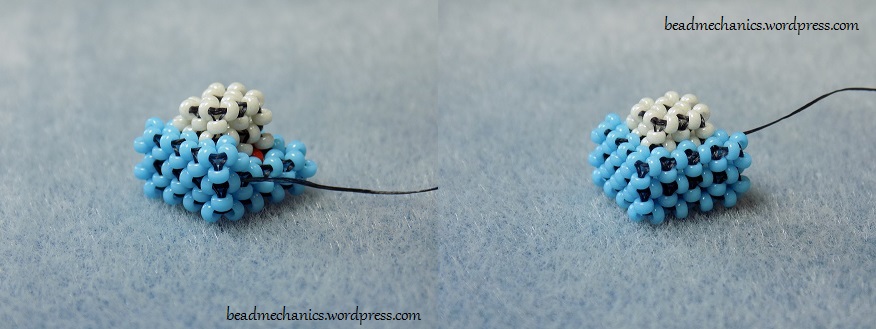
Continue around onto the last edge, adding one corner unit and one edge unit.
The second edge unit on this last edge is going to be slightly different, since it has to include a bead from the very first unit we made:

Here I’ve added the bottom of the unit, the next RAW face is at the back and includes a bead from the previous unit, a new bead, a bead from the very first frame unit, and an orange edge bead from the central cube. The rest of the unit is then completed as before.
Finally, make the last corner (easier as you now have 2 units to join it to!):

Step 4
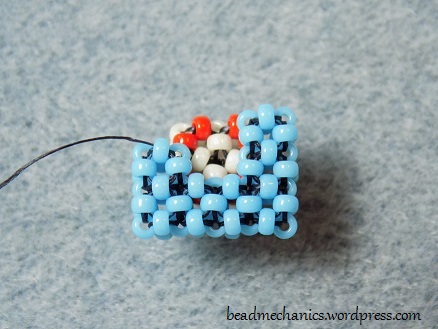
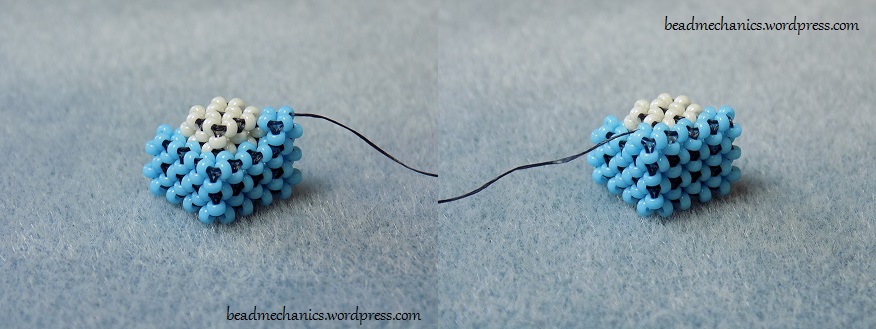
We’re now going to work on two of the three blank faces. Now is a good time to switch to a curved beading needle, as it will make stitching through the existing beads much easier. Start by turning the beadwork upside-down, so the completed frame is facing downwards:
Now start by adding a row of 4 CRAW units along one side, building off the existing beadwork as necessary:
Continue on around the corner, adding 3 more units:
Now we’re going to work another row back the way we came. First add 4 units above the previous row:
Then continue on round the corner, adding 3 more units to finish that row:

Now we have two more faces almost complete!
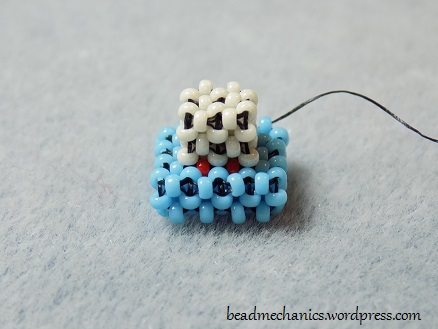
Step 5
Rotate the beadwork around and add 2 units along the remaining edge, separating these two faces into two frames:

That’s two more faces almost complete!
Step 6
We just need to add the final blank face on the top to complete the cube. I found it easiest to start in the middle and work out. Start by adding 4 CRAW units in the middle on top, like this:
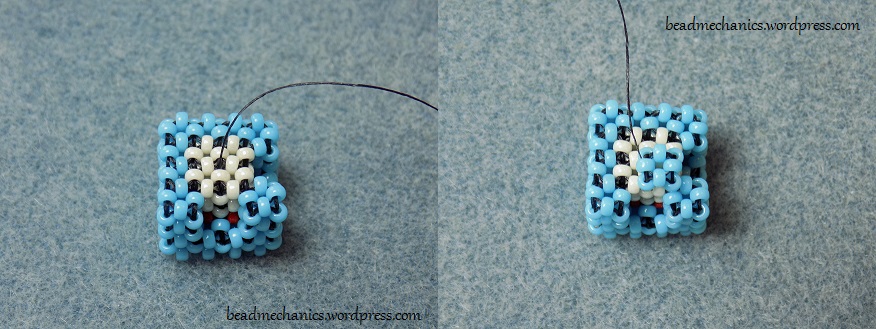
Once all 4 are done it will look like this:

Just the outer edge left to do! Work around the edges, adding a single row of units all around the outside:
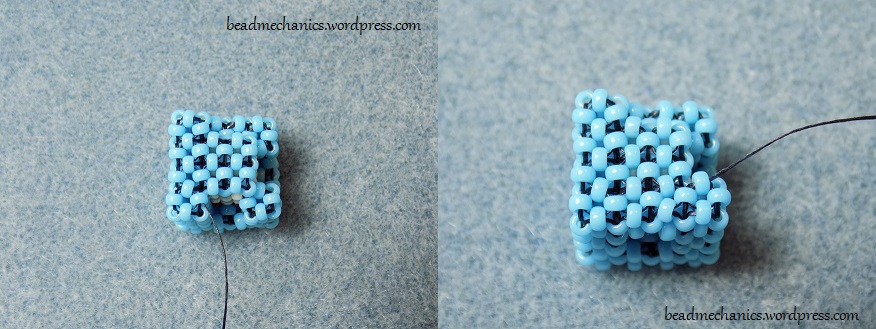
Keep going until the top face is complete:

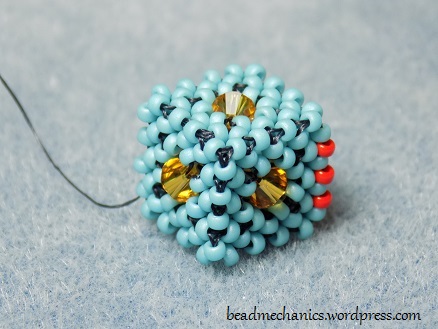
And that’s it for the CRAW! The cube should now have 3 blank faces that meet at a vertex, and 3 frame faces that meet at the opposite vertex:
The last thing to do is to add the crystals!
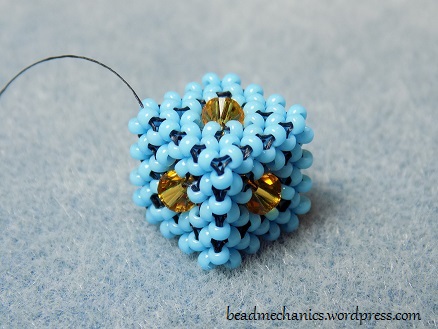
Step 7
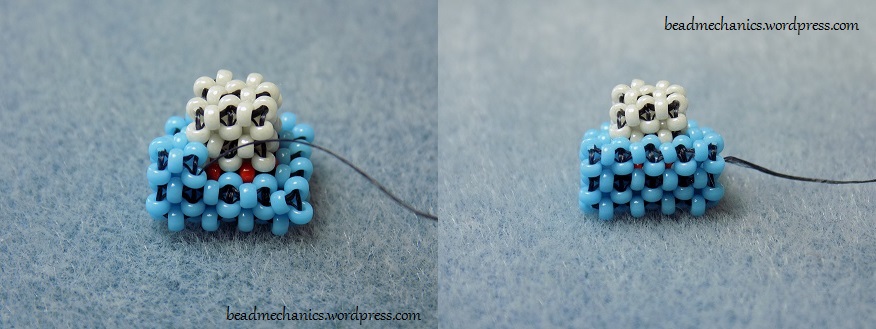
We’re going to add a 4mm crystal to the centre of each frame face. With the cube orientated as shown in the left-hand photo below, we’re going to follow the thread path shown in the right-hand photo from ‘a’ to ‘b’ to add a crystal to the top face:

This is shown in more detail in the photos below. First work through the beadwork to exit the bead shown, then add the crystal and continue:

Work around through the beadwork following the threadpath shown above and stitch back through the crystal, like this:

Now add a crystal to the other two remaining faces. Note that point ‘b’ in the threadpath of the top face is point ‘a’ for the next frame (as shown in the right-hand photo above). Once you’ve completed this second face, the thread will be in the correct place to start the frame on the left-hand side. You should end up with all three crystals pointing towards the top vertex, like this:
Don’t end the thread yet, you’ll need it to complete the hinges.
Up to this point all the cubes are identical, so just repeat the steps above to make all 8 in the same way. Then it’s on to joining them together!
Adding the hinges and joining them together
We’re now going to add some modified right angle weave (MRAW) hinges to each cube and join them together. I’ve followed the same sequence of joining them as I used for the model, so you can refer back to the photos at the start of this post while joining the beaded cubes together.
Cube 1
The hinge pattern for cube 1 looks like this:

The number next to each hinge is the cube it joins to. The first hinge we’re going to add is the one labelled ‘4’ in the photo above. Turn the cube so it’s orientated as shown in the photo below and work through the beadwork to exit from the bead shown:
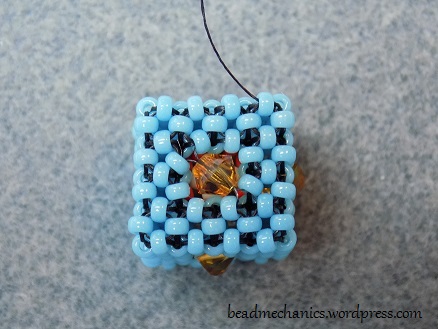
Now we’re going to add the hinge beads along the edge using the MRAW thread path (see the beginning of the post for more about this stitch). I’ve used orange for the hinge beads so they show up clearly.
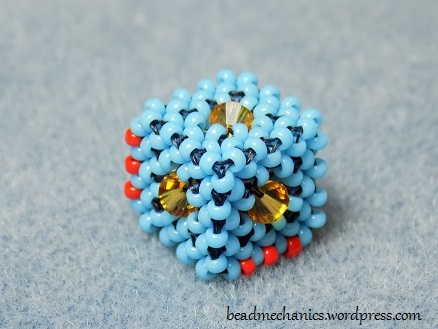
First add one bead and continue on through the top of the next MRAW unit (left photo). Then loop around the top of this unit, through the beads indicated in the right photo:

This extra loop makes sure the hinge beads are held in place nice and securely. Continue along the edge adding in two more hinge beads, following the thread path as shown:

You want to keep a fairly medium tension here – too loose and the hinge will be unstable, but too tight and you won’t be able to join it to the next cube.
Turn the beadwork so you’re looking at the hinge from the other side. Work along through the beads following the MRAW thread path as shown on this side:

The hinge beads should now be held in place with stitches on both sides.
Add in the second hinge (the one labelled ‘2’ in the photo) in the same way, so you have a cube that looks like this:
Weave the end of the thread into the beadwork so it’s secure, and trim it off.
Cubes 2 – 7
For cubes 2 to 7 you’ll add one new hinge, and join to another on a previous cube. For each cube I’ve marked on the photo which other ones they join to, and indicated which is the shared hinge with a circle around the number.
Cube 2
Here’s the hinge pattern for cube 2:

This cube joins to cubes 1 and 3, as labelled. I’ve put a circle around the shared hinge – you don’t need to add this one, just join to it.
So for cube 2 we’re first going to add the hinge labelled ‘3’ using MRAW, just as for cube 1. We’ll end up with a cube that looks like this:
I’ve made it a slightly different colour so you can tell which cube is which! Now we’re going to join it to the shared hinge on cube 1. Bring the two cubes together as shown on the left:

The edges we’re going to join are marked with a dot. On the right I’ve moved the cubes so these edges meet.
Join cube 2 to cube 1 following the exact same MRAW thread path as before – only this time you don’t need to add an extra bead, just use the one from the hinge on cube 1:
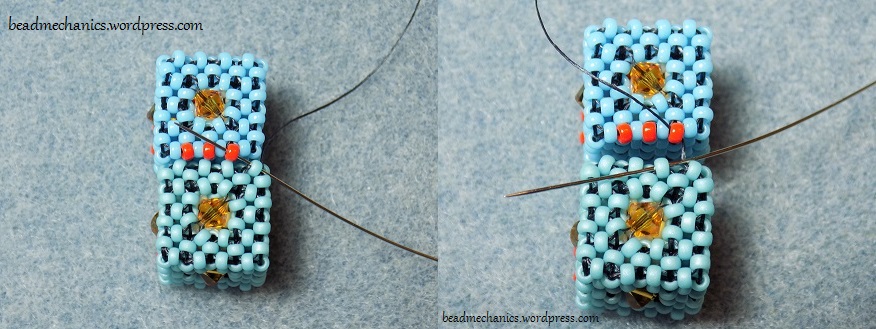
The MRAW thread path is exactly as before:

Once you’ve done one side, rotate the hinge so you can reinforce the other side:

That’s it, you’ve joined the first two cubes together!

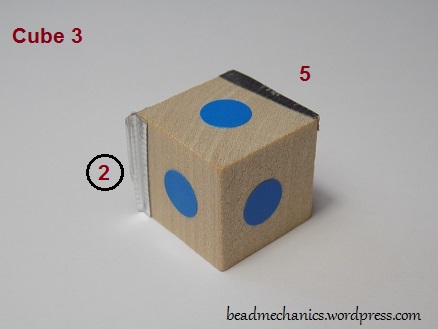
Cube 3
The hinge pattern for cube 3 is shown below – this one joins to cube 2 using the existing hinge (marked with a circle).
Cube 4
Cube 4 joins to cube 1 on the hinge labelled below:

Cube 5
This cube joins to cube 3 as shown:

Cube 6
Cube 6 joins to cube 4:

Cube 7
This cube joins to cube 5:

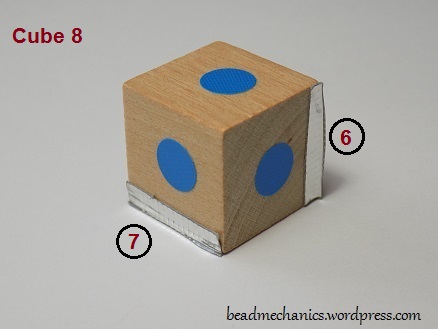
Cube 8
The final cube is a bit different – you don’t need to add a new hinge, just join it to the existing hinges on both cube 6 and cube 7 as shown:
The finished cube
That’s it! You should now have a complete folding cube!
If you want to share some photos of your completed cube I’d really like to see them! You can always head over to my facebook page and post them there!
© Copyright 2016 – 2019 Patricia Verrier. All rights reserved.
These instructions are for personal use only. Please contact me if you require more information.

This is phenomenal. Thank you so much for sharing.
LikeLiked by 1 person
Thank you so much 😚 I will order my beads and give it a try over the holidays !The tutorial looks super , that was really a first ?Thank you !
Von meinem Samsung Galaxy Smartphone gesendet.
LikeLiked by 1 person
Amazing Thanks
LikeLike
Thank you for sharing you magical turning cube(s). I’m going to try it after I have read it a few more times. This is going to test my spacial awareness and logic. Not my strong points, as I tend to jump into beading.
LikeLiked by 1 person
I think it’s definitely one if those pieces that’s easier to understand when you have it in front of you – the model really helped and was easy to make. There are a lot of videos on how to assemble them online too 🙂
LikeLike
SO, SO Cool! Thank you so much for sharing — I want to try and make this 🙂
LikeLiked by 1 person
I loved making your folding cube. The tutorial and photos were fabulous. I am going to make another using round crystals, as I’m hope the cube will close better with them. The bicones stand a little above the beadwork. Anyone thinking about trying this …. my thought are … just go for it. I thought it was beyond me but I did it and learnt a lot. Have fun and enjoy your new turning machine made out of little glass beads and thread. Thank you Bead Mechanics for this tutorial. You rock!
LikeLiked by 2 people
Glad you enjoyed it! I’ve learnt so much myself from other people who’ve shared their knowledge freely online so it’s great to now be able to contribute something back 🙂
LikeLike
Hello !
I’m desperate trying to make this folding cube. I’ve made one with fabric and foam cubes for my grand son a few years ago, so I’m not scared with putting the cubes together (I’ve followed your advise and made one of cardboard too !). But I got stuck on step 2 : I just don’t know how to do that. I’ve spent hours (and money -as I bought some tutorials, which were useless) on the internet, but only found how to make blocks (adding a new rope to an existing one) with CRAW. Could you help me ? Or tell me where I can find the instructions or a tutorial to achieve step 2.I’d really appreciate your help here !
Hoping I get an answer and little help !
Best greetings,
Françoise
LikeLike
Are you ok with joining one CRAW unit to others (as in step 1)? Is it the placement of the units in step 2, or the exact thread path needed to do it that you need help with?
LikeLike