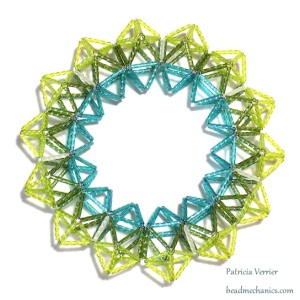
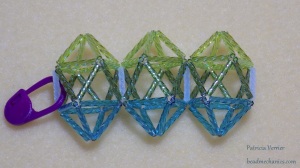
Here’s my latest kaleidocycle!
The book “A Mathematical Tapestry” by Peter Hilton and Jean Pedersen has a discussion of the various rotating rings (kaleidocycles) of polyhedra that are possible, including a diagram of one made of 14 hexacaidecadeltahedra – better known as gyroelongated square bipyramids. It was such an intriguing shape I decided to try and construct one from bugle beads. The finished ring is fascinating – in one configuration it’s rigid but in others it’s completely flexible with many degrees of freedom.

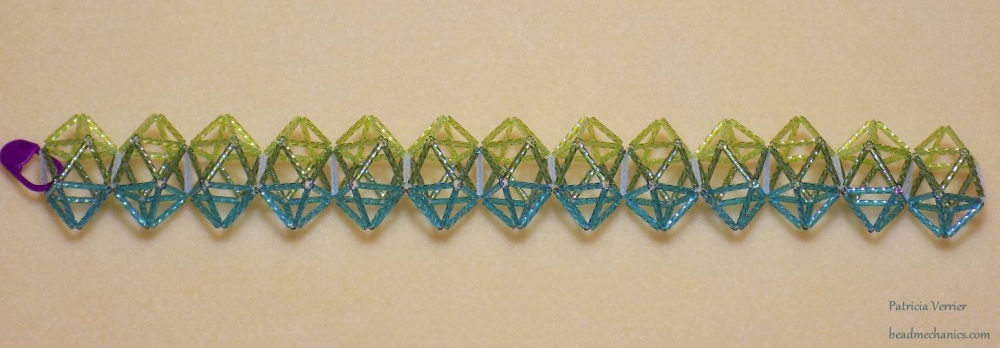
It also makes a great bracelet as it will flex enough to fit over your hand but can then be rotated into the rigid configuration to stay on your wrist!
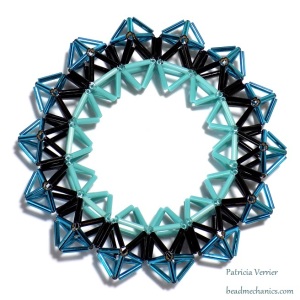
I made the original version with 12mm beads (Matsuno size 5 twisted bugle in Silver-Lined Bronze), but it works with other sizes. The one above is made with 9mm beads (Toho size 3 bugle in Silver-Lined Teal, Opaque Turquoise and Opaque Jet). The bugles just need to be large enough for several thread passes! I use 0.25mm monofilament nylon illusion cord as the thread, which is strong enough not to be damaged by the bugles but thin enough to allow enough passes through each bead.
I did briefly try making a peyote version using triangles (in this case the units are Eva Mari Keiser’s “gyro-eggs”), but unfortunatly it didn’t work very well as the shapes lose their defining sharp geometric shape.
So what is a Gyroelongated Square Bipyramid? It’s two square pyramids (the square bipyramid part) connected with a strip of 8 triangles formed into a ring (the gyroelongated part). Here’s a square pyramid and a square bipyramid (aka an octahedron):


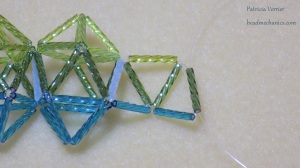
Here’s a strip of 8 triangles which can be made into a ring to make a square antiprism:


Put this in the middle of the square bipyramid (octahedron) and you get a gyroelongated square bipyramid:


It’s an interesting shape! The two pyramids are at angles to each other and you can find pentagons made from 5 triangles at almost every corner.
They can put together into a kaleidocycle by using evenly spaced bugle beads from the middle (the gold ones in the photo above) as shared hinges. These hinges will be at an angle to each other if you look at the shape from the side, rather than parallel. Turns out that this is the critical feature for getting a kaleidocycle to work, and it’s why you end up with sets of mirror polyhedra in a complete cycle.
Below is a tutorial on how to make a four-colour version of this kaleidocycle! Please be careful with it though – remember that it’s made from fragile glass beads which may have sharp edges, so should be treated with care!
Tutorial
This tutorial is also available as a pdf!
Materials
Since bugle beads can be very different weights I’ve given the number of beads needed along with the approximate weight specifically for spiral Matsuno 12mm bugles in brackets.
- Matsuno 12mm spiral bugle beads:
- 14 beads (1g) – Ceylon White #334 (A – the hinge beads)
- 84 beads (6g) – Olive Rainbow #025R (B – the central strip of triangles)
- 112 beads (7g) – Lime Rainbow #550R (C – the top pyramids)
- 112 beads (7g) – Teal Green Rainbow #021R (D – the bottom pyramids)
- Illusion cord, 0.25mm (0.01″) diameter, clear
- Tweezers
The tweezers are helpful in getting the cord through the bugles if it’s slightly stuck or the angle is difficult.
Overview
The basic unit is a gyroelongated square bipyramid, and the complete kaleidocycle is made from 14 of these. They are arranged in symmetrical pairs – although the symmetry is fairly subtle. The units are joined together by a shared hinge bead on either side (the colour A beads). One unit is made first, and the next is built from the shared hinge, and so on.
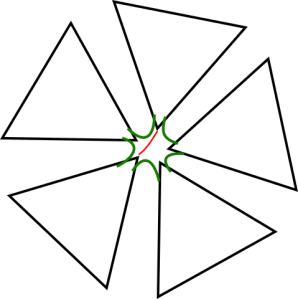
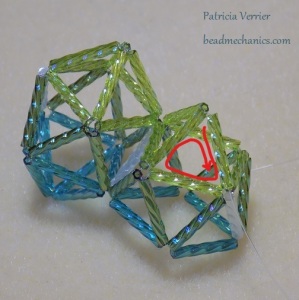
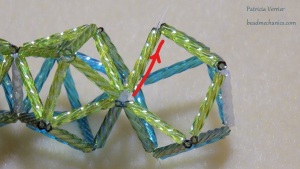
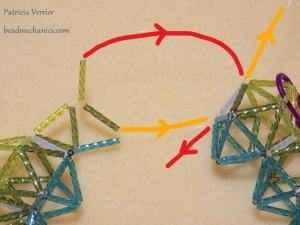
The units are made using two-“needle” triangular weave (although you don’t need a needle with this thickness of cord!). As for any weave, when moving from triangle to triangle you go on to the edge of the nearest one, and never across a “gap” to a more distant one. That is, you follow thread paths as shown in green below, but never the path shown in red (as it creates weaker joins between triangles):
Use a firm tension, but be aware that the illusion cord will not hold this tension until a few triangles back.
Throughout this tutorial the “top” of the cycle is the side with lime beads (C) and the “bottom” is the side with teal beads (D). The “top end” of the cord (or upper cord) is the end nearest the lime beads and the “bottom end” (or lower cord) is that nearest the teal beads.
Part 1 – Making the first unit
A unit is constructed by making a strip of triangles, forming it into a ring, and then adding the pyramids on the top and bottom.
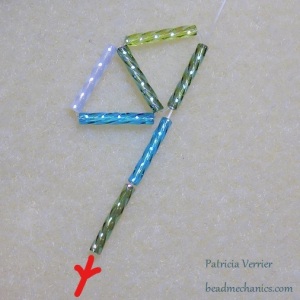
Step 1: On 125 cm / 50 inches of illusion cord string 1D, 1A and 1B and move them to the middle of the cord:

Step 2: Take the end of the cord exiting from the first 1D strung and pass it through the last 1B strung, to form a triangle:

Make sure that the loop is in the middle of the cord so that the two working ends are about the same length. (The is two “needle” weave so both ends are used to make the triangles.) Pull the tension tight (although it will bounce back slightly at this stage).
Step 3: On the same end of the cord exiting the top of the last 1B bead, string 1C and 1B:

Step 4: Pass through the 1B again with the other end of the cord (the one exiting from the bottom of the previous 1B) to make another triangle:

The strip of triangles will continue to be worked like this, with lime beads (C) along the top and teal beads (D) along the bottom.
Step 5: Pull both ends of the cord to tighten up both triangles. String 1D and 1B on the lower cord (the end exiting from the last 1B):
Step 6: Switch back to the top cord, and pass through the 1B just strung and pull the tension tight:

Step 7: Switch to the other end of the cord (the one at the top) and string 1C and 1A:
Step 8: Pass the other end of the cord up through the 1A and pull the tension tight:

Step 9: String 1D and 1B on the lower end of the cord:

Step 10: Then pass through the 1B with the top end of the cord:
Step 11: String 1C and 1B on the upper cord:

Step 12: Pass back up through the 1B with the lower cord:

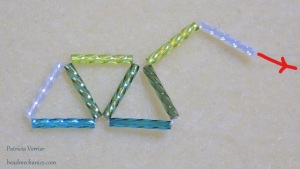
Step 13: String 1D and 1B on the lower end of the cord:

Step 14: Pass down through the 1B with the upper cord:
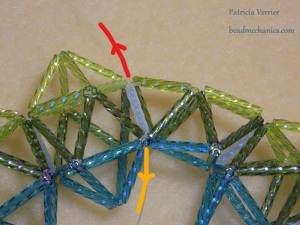
Step 15: This step is where things can go wrong, so make sure your work looks exactly like the photos!
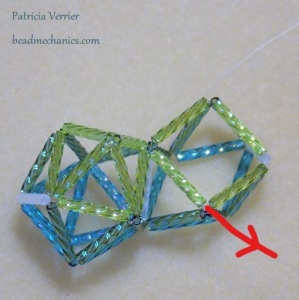
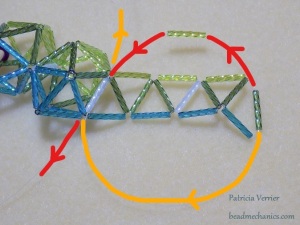
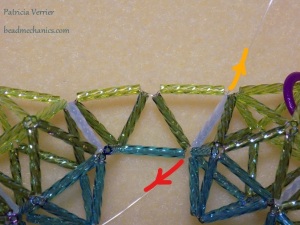
String 1C on the top cord and pass it back downwards through the first 1A bead of the strip of triangles but do not pull it tight yet (red line below). Pass the lower cord up through the same 1A bead, but again do not pull it tight (orange line below):
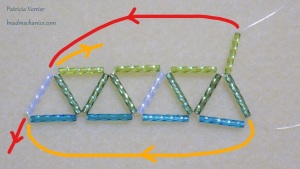
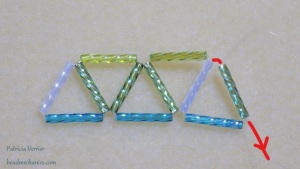
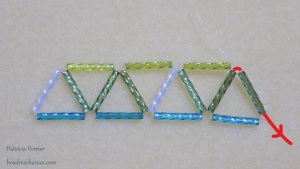
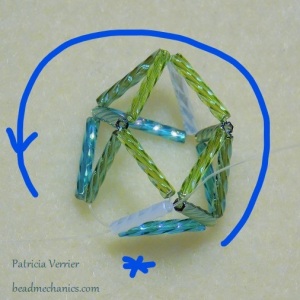
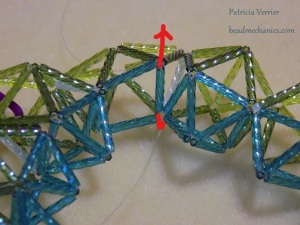
Start to pull both ends of the cord to form a ring, making sure that the most recent beads added (the right-hand end of the strip) go round behind the others. If you look from the top, the newer beads will go around in an anticlockwise direction, as shown below (the start marks the first beads):
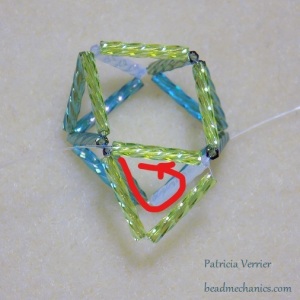
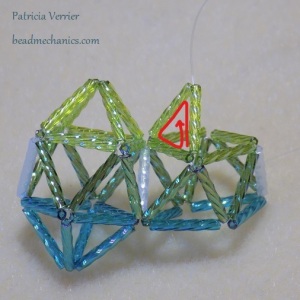
If you get the direction wrong here the following units will be incorrectly orientated and the kaleidocycle won’t work. Looking at the beadwork from the side with the first 1A (white) to the front you should see a ‘Z’ with a 1C (lime) at the top and a 1D (teal) at the bottom. Pass the top cord through the 1C, and then pass the bottom cord through the 1D and pull the tension tight:

Be careful to check that your work looks like the photo above. Take care here as well not to pass through the wrong beads, you should always be following a triangle threadpath, and not crossing a gap.
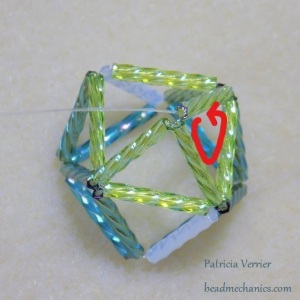
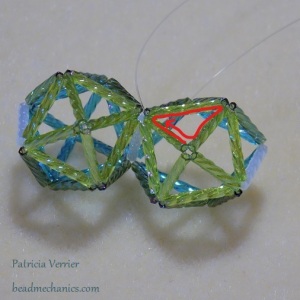
Step 16: The top pyramid will now be added by building from the four lime beads around the top of the ring. This is done using just one end of the cord. String 2C and pass back through the bead the thread was exiting from to form a triangle:
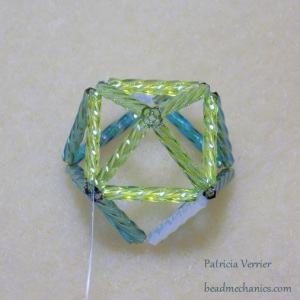
Step 17: Pass through the 2C added last step and then through the next 1C on the base:

Step 18: String 1C and pass down through the second 1C strung in step 17, back along the base and back up through the 1C added this step to form another triangle:
Step 19: String 1C and pass back along the next bead in the base and back up through the 1C added in the last step to make another triangle:

Step 20: Pass down through the 1C strung last step, along the last base bead, up through the first 1C from step 16 and finally back down through the same 1C strung last step. This completes the threadpath for the last triangle:

Weave the end in by weaving around the pyramid, being careful to follow the same threadpaths. If this is difficult you can weave through the central strip of triangles, but avoid passing the cord through the 1A hinge beads as you will need to work from them later. The finished pyramid should look like this:
Step 21: Turn the bead work over, and using the other end of the cord repeat steps 16 to 20 using D beads to form the other pyramid:

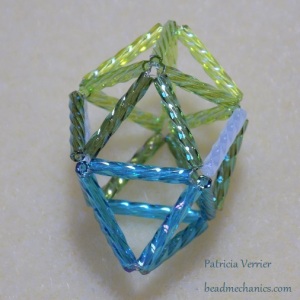
Weave in the end as before and trim. The finished gyroelongated square bipyramid unit should look like this:
Part 2 – Making the second unit
Step 1: Using a new 125 cm / 50 inch length of illusion cord pass through one of the 1A beads on the first unit (it doesn’t matter which). Pull the cord through so that both ends are equal length:

Step 2: String 1D and 1B on the lower end of the cord:
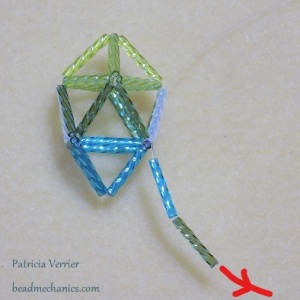
Step 3: Bring the upper end of the cord down through the 1B to form a triangle:
Step 4: Repeat steps 3 to 14 from part 1, so you have strip of 7 triangles attached to the first unit:

Step 5: This step is another where things can go wrong, so once again be careful to make sure your work looks exactly like the photos!
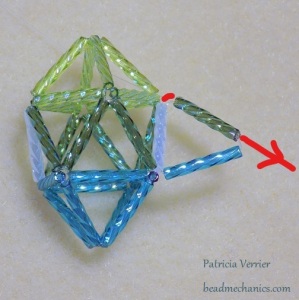
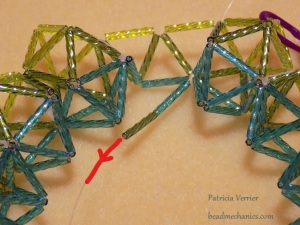
String 1C on the top cord and pass the end down through the 1A from unit 1, but do not pull tight yet. Pass the lower end of the cord up through the same 1A, but don’t pull tight:

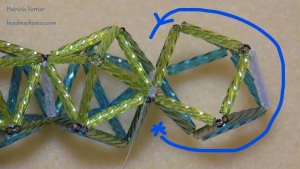
This time, gently pull both ends of the cord so that the right-hand end of the string goes in front of the rest of the beads. If you look from the top, it should go in a clockwise direction from the first to last beads:

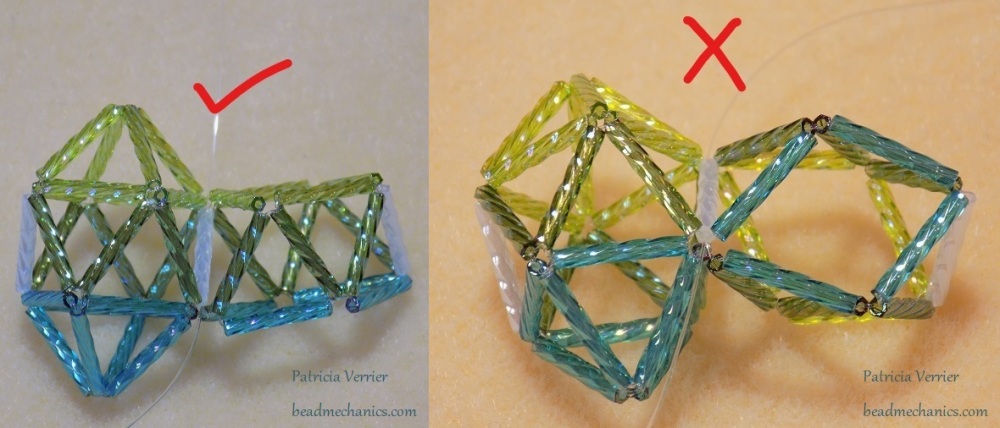
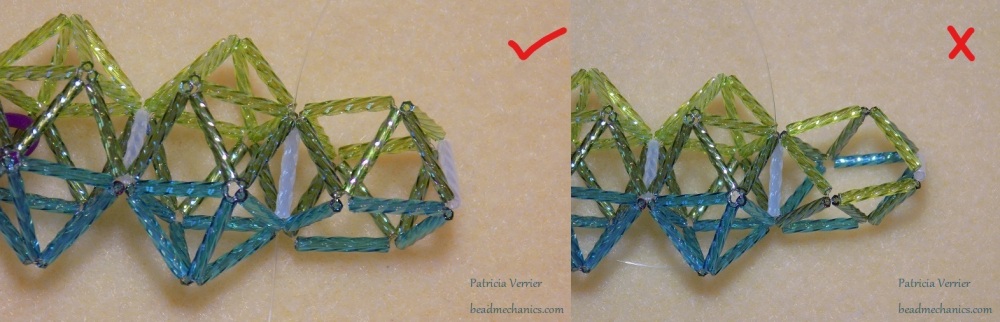
If you get the direction wrong here the unit will be incorrectly orientated and the kaleidocycle won’t work. If you look at the work from the side then you should see that it is symmetric about the hinge – the same colour beads fold together (left-hand photo below). If you have a teal bead meeting an olive bead (right-hand photo below) then one of the rings was folded round in the wrong direction – you can correct it by pulling the thread loose and fold it the other way.
Step 6: Pass the top end of the cord through the 1C bead towards the front of the beadwork (this should be following the triangle thread path):
Turn the beadwork over and do the same with the other end of the cord through the 1D bead towards the front (in this orientation):

Pull both ends tight. This helps maintain the tension when working the pyramids.
Step 7: The top pyramid will now be added similarly to before, although the threadpath is slightly different as the cord points in a different direction.
Turn the beadwork back over and string 2C on the end of the top cord and pass back through the base bead it exited from and then through the first 1C strung again, to form a triangle:
Step 8: String 1C and pass through the next base 1C back towards the previous triangle, and up through the second 1C from the last step, and down through the 1C added at the start of this step:
Step 9: Pass the cord through the next base 1C. String 1C and pass down the 1C added last step and then again through the base and 1C added this step to form another triangle:

Step 10: Complete the threadpath for the last triangle by passing down the first 1C added in step 7 and then back along the next 1C base bead and back up the 1C added last step, and finally down through the first 1C again:
Step 11: Repeat steps 7 to 10 with the other end of the cord using D beads to make the bottom pyramid:

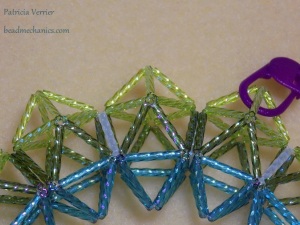
Step 12: Before you weave in the ends, clip a stitchmaker (or tie a piece of thread) around a bead on the first unit made. This helps with keeping the beadwork orientated so that the next units are added to the right side:

After you’ve done that, weave in the ends as before (being careful again to avoid passing through the A hinge beads):

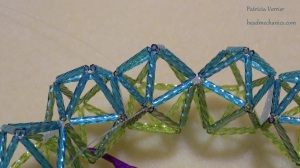
The two units should fold easily about the shared hinge in the middle.
Part 3 – Making the third unit
Step 1: Repeat steps 1 to 4 from part 2 so that you have a string of 7 triangles built from the 1A bead on the right-hand side of the second unit:

Step 2: This step is another where things can go wrong, so once again be careful to make sure your work looks exactly like the photos!
String 1C on the top end of the cord and pass it down through the 1A bead from the second unit, but do not pull the cord tight yet. Pass the lower end of the cord up through the same 1A bead similarly:
Gently pull both ends so that the strip forms a ring and the right-most beads (those added last) pass behind the rest of the strip. If you look from the top, it should go in an anti-clockwise direction from the first to last beads:
This is the same as the first unit – the odd units are all anti-clockwise, while the even units are the opposite.
The completed ring should again be symmetric about the 1A bead – a teal bead should meet a teal bead and a lime bead a lime bead, as shown on the left-hand side below. If it looks like the one on the right-hand side then the ring was folded round in the wrong direction.
Step 3: Using the top end of the cord pass through the nearest 1C bead towards the back of the beadwork following the triangle-weave threadpath:
Turn the beadwork over and do the same with the bottom end of the cord through the nearest 1D bead:

Step 4: Follow steps 16 to 21 from part 1 to complete the top and bottom pyramids, then weave in the ends and trim.
Part 4 – Making units 4 to 13
Repeat the steps in part 2 followed by part 3 five times (i.e. alternate between them) to make the next ten units:
There should now be 13 units in total.
Part 5 – Making unit 14
Step 1: Repeat steps 1 to 3 from part 2, followed by steps 3 to 6 from part 1 to make a strip of 3 triangles:
Step 2: String 1C on the top end of the cord:

Step 3: Bring the first unit down and round in a circle so that it is to the right of the last unit:

Pass the top end of the cord down through the left-most 1A hinge bead from the first unit. Pass the bottom end of the cord up through the same 1A bead as well:
Pull both ends of the cord tight:
Be careful to keep the tension tight from this point onwards, as the two sides of the beadwork will want to pull the weave apart at this join.
Step 4: The rest of the triangles will be worked back towards the previous unit in front of the strip just made. As before, it’s important that they are in front of the previous triangles for the cycle to work.
String 1D and 1B on the lower end of the cord:
Step 5: Pass the upper end of the cord through the last 1B strung, making sure the newly formed triangle is in front of the others (red threadpath below). On the other end of the cord (now the top cord) string 1C and 1B (orange threadpath):
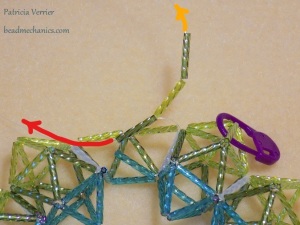
Step 6: Pass the bottom end of the cord up through the last 1C strung to form another triangle (red threadpath). On the other end of the cord string 1D and 1B (orange threadpath):

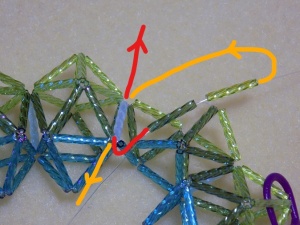
Step 7: Pass the top end of the cord through the last 1B strung (shown in red) and make sure to pull both ends tight to maintain the tension:

Step 8: String 1C on the top end of the cord and pass down through the 1A bead on the previous unit. Pass the bottom end of the cord up through the same 1A bead:
Pull the tension tight with both ends of the cord:
As before, make sure the joins to the hinges on the previous unit and the first unit are symmetrical.
Step 9: Turn the ring over and pass the bottom end of the cord up through the nearest 1D bead, making sure to follow the triangle-weave threadpath:
Turn the ring back over and do the same with the top cord, passing it through the nearest 1C (the one nearest the front):

Step 10: Now rotate the units on the ring (i.e. turn it like a kaleidocycle) so that the lime beads are facing upwards:

Complete the top pyramid by following steps 7 to 10 from part 2:

Step 11: Turn the ring over so that the teal beads are facing upwards:

Now complete the bottom pyramid in the same way using D beads:
Step 12: Finally, weave in the ends and trim to complete the last unit:
Remove the stitch marker and then the kaleidocycle is all finished!

Here’s a video of this four-colour version action:
If you have any questions about this tutorial or would like some help, just ask! You can either leave a comment here, or contact me through my facebook page.
Happy beading!
© Copyright 2019 Patricia Verrier. All rights reserved.
These instructions are for personal use only. Please contact me if you require more information.

OMG!! I love it!!!
Just glanced at my IPhone and saw this amazing piece!!!!
Sent from my iPhone
>
LikeLiked by 1 person
Thank you so much,Pat! So much work went into the very clear instructions. All I need now are more days in the week!
LikeLiked by 1 person
You’re welcome! 🙂 These bugle bead shapes are fairly quick to make – at least, a lot quicker than some of the other shapes I bead!
LikeLike
Thank you for referencing my works. I am a fan of your beading explorations. Happy 2019!
LikeLiked by 1 person
Thank you! I love your work! I made some gyro eggs years ago following your great tutorials, and it took me far too long to realise these were the same shape – they seem so different in peyote stitch!
LikeLike
Many thanks. I have made several variations of them and will find it challenging with bugle beads. Thank you for the tutorial and inspiration.
LikeLiked by 1 person
Excellent job of writing up the process for others to give the form a go! Stunning bracelet too.
LikeLiked by 1 person
I love my gyroelongated square bipyramid toy! Great tutorial, thank you for sharing.
LikeLiked by 1 person