I was challenged a while ago to see if I could make a dodecahedron out of rick racks. After a bit of experimenting I ended up with this, a Contemporary Geometric Beadwork rick rack dodecahedron!

It’s made from small 5-sided rick racks joined together with warped squares. The rick racks are the light blue beads you can see, zipped together at the top with dark blue beads. The warped squares joining them together are the dark blue diamonds you can see in-between each rick rack.

This piece actually started out life in pink and yellow. I made a few test pieces first to see if the idea would work with the closest beads to hand. I originally thought it would work with the rick racks the other way up, but quickly found out that I’d made a mistake in working out the angles and that didn’t work! But that mistake is why I zipped the tops of the rick racks together – initially I’d thought they might slightly collide with their neighbours unless their sides curved inwards. Although I was completely wrong on how I’d imagined them fitting together I liked the shape of the closed rick rack, so kept working with it. Once I had a structure I was fairly sure was going to work I then spent far too much time deciding on the final blue colour scheme. (Picking colours is far harder than working out the geometry!)
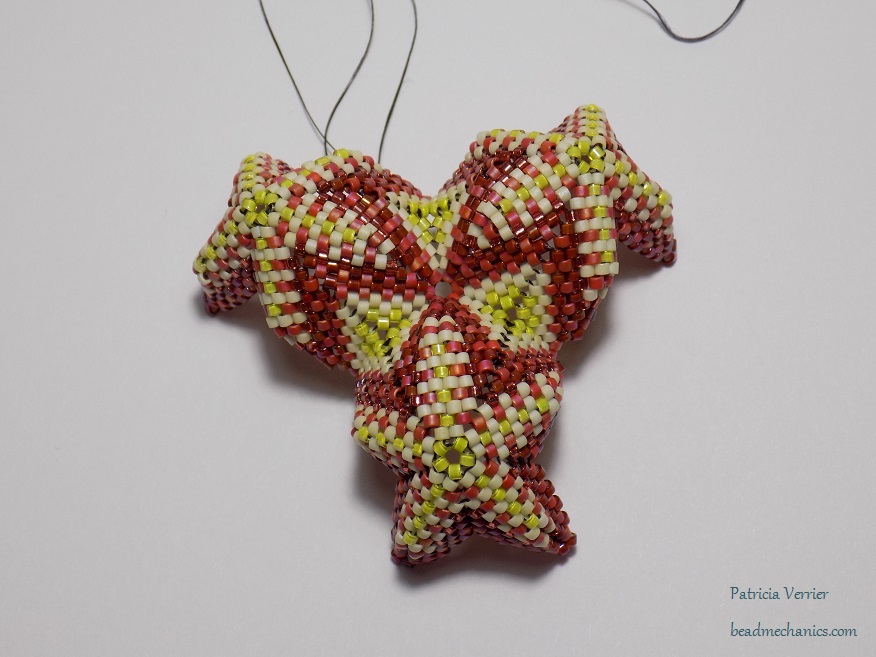
I made each rick rack by casting them from a CGB Pod-Cast bead. The pod makes these small rick racks so much easier. I’m not good at starting a rick rack from scratch as I can never get the tension quite right, and the MRAW band method would add a lot of overhead for such small pieces. I would never have attempted this shape before! Here’s the finished dodecahedron with the Pod-Cast bead used to create it:

Despite having spent ages picking them out I was still a bit worried about the colours to start with, but now it’s finished I really love it – I’ve already started a second variation!
Since the whole shape is based on CGB techniques, and a big part of the CGB project is sharing ideas, I thought it would be good to give some instructions here on how to make it. So, here is a brief tutorial!
Tutorial
This tutorial is also available as a pdf!
The dodecahedron is made out of 12 rick racks and 30 warped squares. The completed rick racks are stitched together with the working thread from the warped squares to make the larger shape.
It is a bit tricky in parts as the curves make it hard to stitch through some of the beads, but a curved beading needle will help a lot with this.
Materials
- Size 11 delicas (the quantities are a bit approximate, I forgot to weigh them before I started, sorry!):
- DB 2 – Metallic Blue Iris (A), ~ 7g
- DB 436 – Galvanised Pewter (B), ~ 5g
- DB 452 – Galvanised Dark Grey (C), ~ 5g
- DB 2128 – Duracoat Opaque Nile Blue (D), ~7g
- DB 2130 – Duracoat Opaque Underwater Blue (E), ~3g
- DB 2133 – Duracoat Opaque Azure (F), ~7g
- A Contemporary Geometric Beadwork five-sided pod cast with at least 5 beads per side. (See the CGB podcast tutorial video and CGB podcast pattern for instructions on how to make a casting pod.)
- Nymo Size B in Navy
- Size 12 beading needle
- Size 10 curved beading needle (essential!!)
Rick Racks
If you haven’t made a CGB rick rack before you can find instructions on the CGB website (and in CGB vol. 1 and vol. 2 too)! The rick racks here are built from a five-sided Pod-Cast, with at least 5 beads on each side. My pod has 7 beads per side, but that doesn’t matter, I can just use 5 beads per side and skip the last two:

Instructions on how to make a Pod-Cast and cast a rick rack from it are available on the CGB website – both as a written pattern and a tutorial video.
The rick rack pattern I used is fairly simple, with five beads on each side of the rick rack, as shown in the diagram below. (Note that it’s a continuous band worked in the round, not flat, it’s just easier to draw it this way!) Each row is just a different colour, in the following order: D, F, E, F, D, B, C, A.

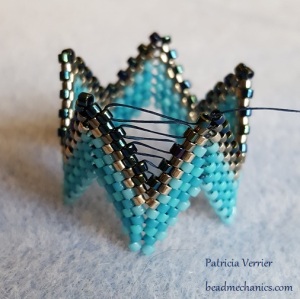
Tack the first row onto the pod using a short piece of thread (in a different colour if you have one) and extra size 8 seed beads at the decreases so you can remove the rick rack later. Then start the second row with a new piece of the navy blue thread, about 5′ long. Leave about a 10″ tail so you can reinforce the first row later. Continue with this blue thread until the rick rack is complete:

Remove the rick rack from the pod by cutting between the size 8 seed beads on the first row. Once that’s done weave in the tail thread around the first row to reinforce it, but leave the working thread at the top:

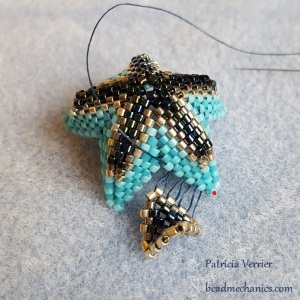
Weave the working thread around to exit a bead in the middle of the increase at top of one of the peaks (as in the above photo). Add a point bead and then add 4 more peyote stitches with the blue iris (A) beads:

Then zip these beads to the next peak like this:
Pull the thread tight so the sides join together, and then reinforce the join by doing a square stitch around the two beads at the top of the join:

Continue around zipping up the other sides in the same way, and then do a loop around the point beads to hold the centre together:

Reinforce this loop a few times, then weave in the thread. That’s it, the rick rack is complete!

You need 12 of these in total for the complete dodecahedron.
Warped Squares
The pattern for the warped squares is also fairly simple, as shown below. It’s just two rows of A followed by one of C and one of B.

Use about 18″ of thread, and leave about a 5″ tail. At the end of row 4 leave the working thread but weave in the tail thread around the first 3 rows to reinforce them.

Weave the working thread around the last row until it’s exiting from the first bead after a valley, as shown above.
You’ll need 30 warped squares like this in total.
Joining the Pieces Together
The rick racks are the faces of the dodecahedron and the warped squares sit over the edges. We’ll assembly the pieces together by zipping the warped squares to the rick racks.
Pieces 1 and 2
Two sides of each warped square will be zipped to one “side” (or peak) of each rick rack using the beads shown in the photo:

So, to join the first two rick racks together, start by zipping a warped square to one of them as shown below. Note that you need to skip the first bead on the first side of the rick, as marked below in red (you’ll pass through this bead at the end).
Continue zipping down the other side of the square:

When joined it should look like this, with the working thread exiting from the last bead on the rick rack:

Now zip the square to the other rick rack, making sure that on this rick rack you do pass through the first bead (as shown in red):

Once you’ve joined the warped square to the second rick rack continue back around to the first side to stitch through that bead skipped at the start (note that the beadwork is now the other way around to the last photo!):

The curved beading needle will help here, as the angle can make it quite difficult to stitch this last part of the join.
(If you find this last part of the join difficult you could try starting the join further along the warped square instead, so the last bead in the join is higher up on the rick rack. Another alternative might be to not fully complete the rick racks before joining them – leave them open and zip the tops together afterwards. However I haven’t tried this so I’m not sure how well it would work!)
End the thread by weaving around the sides of the first rick rack to secure it. The first join is complete!

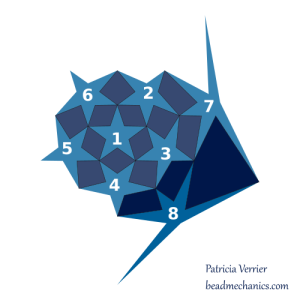
Unfortunately I didn’t take many in-progress photos (I was impatient to see how it would turn out!), but I’ve put together some diagrams to illustrate the next few steps. The diagram for this step is shown below, with the warped square in dark blue and the rick racks in light blue numbered in the order they are added.

Piece 3
The third rick rack needs 2 warped squares to connect it to the first two, as shown in the diagram below (the existing pieces have been grayed out so you can see where the two new squares are added). This third rick rack is joined to the other two in exactly the same way as the last two were joined together.
It’s easiest if you attach both warped squares to the existing rick racks before joining them both to the new one.

Pieces 4 and 5
The next two rick racks are joined in the same way, with two warped squares each:

Piece 6
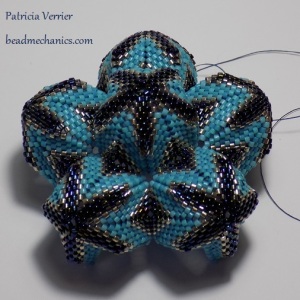
Piece 6 needs three warped squares to join it to the beadwork as shown below:

As for the previous pieces, it’s easiest to attach the warped squares to the existing beadwork before zipping them to the new rick rack.
When done it should look like this:
Half-way!
Piece 7
We have the top half of a dodecahedron completed. The next pieces are added in to make the bottom half in a similar way.
The 7th rick rack needs 2 warped squares to join it to the beadwork, as shown in the diagram:

The rick rack looks a bit odd in the diagram as the work is very curved at this point and the only way I can draw it is by stretching it out flat! The squares and rick racks are all exactly the same, and as you add more pieces the beadwork will close in on itself from this point onwards.
Join piece 7 as shown using 2 warped squares. The photo below shows how the beadwork will look when the warped squares have been attached to the existing rick racks (their working threads are still there, just hidden behind the beadwork). Piece 7 will then be joined to them exactly as before.

Piece 8
The next rick rack gets added next to the last one, and needs three warped squares to join it to the beadwork, as shown in the diagram. Remember, the diagram is flat, but the beadwork will be curving back on itself at this point!
Piece 9 and 10
The 9th and 10th rick racks are added in the same way as well, using three warped squares each:

Piece 11
The 11th rick rack needs four warped squares to join it to the beadwork, like this:

Piece 12
If you turn the beadwork over you should have an almost complete dodecahedron with a gap at the top where the last piece goes. It will need 5 warped squares to attach it, as shown in the diagram:

Once you have added each warped square to the dodecahedron you will join them to the last rick rack. Unfortunately this is where my diagram falls down as I can’t show the last piece on it! Instead, I’ve drawn on the photo below how the last piece will fit – the five warped squares are outlined in orange and the rick rack in red:

My advice for this last rick rack is to zip all five warped squares to the last rick rack very loosely, and once that’s done go around and pull the thread tight on each of these joins in turn. This makes it a bit easier as it gives a bit of extra room for manoeuvre with the beading needle. Once that’s done, weave all the threads in as before, and it’s all finished!
Any questions, just ask! Happy beading!

© Copyright 2018 – 2019 Patricia Verrier. All rights reserved.
These instructions are for personal use only. Please contact me if you require more information.

This is brilliant. I love it!
Thank you for showing us. ❤
LikeLiked by 1 person
Stupendo!♥️ Grazie!
LikeLike
Incredible work as always, Pat – I just love the way you think.
And that it all came off of a PodCast bead…. WOW.
LikeLiked by 1 person
Thanks! Your PodCast bead opens up so many new possibilities for shapes like this – now I just need to find some more hours in the day to bead them all!!
LikeLike
OMG I have soo many UFO’s but feel the need to start this straight away lol. I know my enthusiasm exceeds my beading time. I just love this. Now that I am ‘in to’ 3d beading there are so many things I want to make. I just hope there is a way of saving this until I get the time to make it
LikeLiked by 1 person
I know that feeling! I have so many half-made shapes that I’ve temporarily abandoned to make way for another idea…
You should be able to save the link to this individual post (rather than just the one to the main page) to come back to it later – there’s also a link to it from the tutorial page.
LikeLike
Thank you so much!
LikeLiked by 1 person
Thank you Pat for the very good pictures and drawings. I love it what you did.
LikeLike
Thank you 🙂
LikeLike
Gracias
LikeLike
grazie mille per il tutorial
LikeLike
Thanks a lot for sharing ! it’s stunning !
LikeLike
Bonjour. Merci pour ce partage. J’aimerais réaliser ce Rick rack dodecahedron. Je ne connais pas la technique du podcast, mais j’espère comprendre les explications. Y a-t-il un inversion entre les DB 452 et 436 (la description des couleurs ne correspond pas à la référence?).
LikeLike
Yes sorry colour B is 452 (pewter) and C is 436 (grey) – now fixed!
LikeLike
Merci pour la correction Cordialement Arlette
>
LikeLike
Bloody Brilliant! I love how you made each unit. Really love your Rick Rack Dodecahedron. Thank you for the tutorial.
LikeLiked by 1 person
Thanks so much for putting this together. When I was first learning beading, I made a small pod. Now I have something awesome to make with it!
LikeLiked by 1 person
I’ve made rikrak before with different sized podcasting frameworks. But all had an even number of sides. How do you do a podcasting framework with 5 sides? This is stumping me…
Thanks!
LikeLike
I use side to mean both the up and down bit of a “peak” on a podcast – so 10 total segments of peyote between herringbone increases/decreases if that makes sense?
LikeLike
As always, another great tutorial. Your explanations and diagrams make it so easy to follow along. I’m looking forward to working this one.
LikeLiked by 1 person
Maravilloso!!!!
LikeLike